The printer is reenabled, except for thesis printing.
If you need to print a thesis, you can make use of the „Fotostelle“ of the university’s library.
Scanning
You can easily scan documents for free (even if you are not a CS / approved student). After logging into the machine, you will have two options:
- Easy scan
- Advanced scan
Depending on which you pick, you will have a slightly different UI. However, both will send the scanned image to your students mail.
Due to limitations of the HIZ Mail System, there is a size limit of about ~30MB for the scanned document. Large scans can thus fail. Please keep this in mind, especially when scanning a lot of pages (such as lecture notes or a book) and/or scanning with high DPI. We are currently working on a solution that will allow you to scan larger amounts. In the meantime, to scan large documents, you have the following options:
- Split the scan into multiple smaller jobs
- Scan to USB
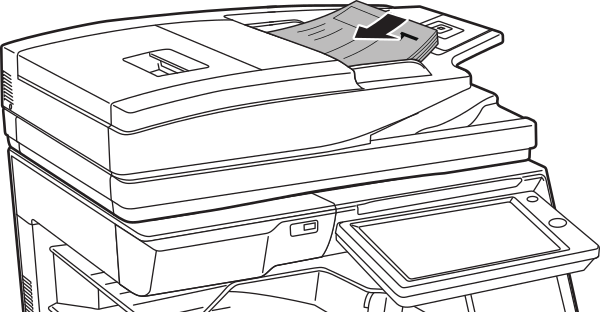
Using the Automatic Document Feeder
The automatic document feeder is the preferred way of scanning, except when scanning books. When using the automatic document feeder, place the originals in the document feeder tray. Take care to place the originals face up and in the correct order, with the first page on the top. The printer will automatically take the originals in and scan both sides (depending on if you have enabled duplex scan in the settings).
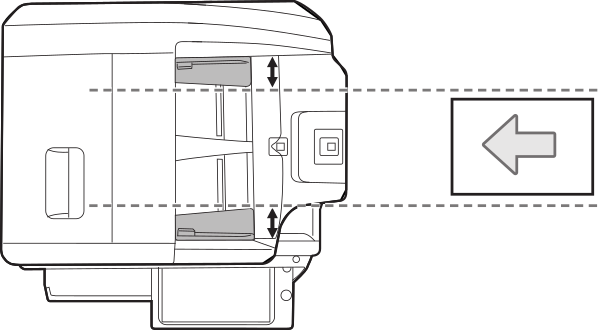
Adjust the original guides to the width of the originals.
Place the originals face up with the edges aligned evenly. The indicator line indicates approximately how many originals can be placed.
Using the Document Glass
The document glass is primarily designed for books. Open the top cover and place the original face down, aligned at the top left corner marked with an arrow ▶.
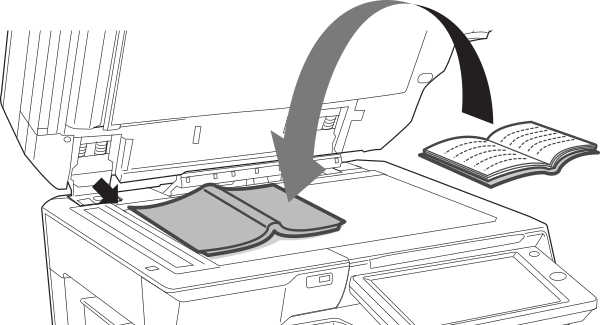
Ensure that the orientation is correct. The "preview" function of the advanced scan menu is helpful here.
Common Settings
In both the easy and advanced scan modes, you will be able to adjust the most common settings. However, in advanced scan, even more options are available, in addition to a preview function. The following is a list of common options
- The DPI (dots per inch). Usually 300 are enough, but for exatra high quality you might want to choose 600. Keep in mind that it will substantially increase the file size.
- The file format. PDF is usually suited for (potentially multipage) documents, but you can also scan to "normal" image file formats.
- Preview function. Very handy.
FAQ
In Advanced Scan, the status icon on the top right shows "processing", but seems stuck / takes ages.
By default, the printer will perform OCR (detect text in your scans and make it selectable in the output PDF). This significantly increases processing time. You can disable OCR in the Advanced Scan under "Format" (it will be set to English OCR by default).
I do not receive an email. What do I do?
It may be that your scanned file size is too large, and the e-mails would be filtered by the university mail system. This limit is reached rather quickly, especially if you use 600DPI scan. Sadly, the only option in this case is to Scan to USB.
Why do I get weird error messages about not having enough credits?
This is sadly a false flag. Scanning is free and does not require any credits. Rather, it indicates that your scan was too large. We impose a limit of 20MB per scanned file; partly due to the fact that the university mail servers will not accept more. We advise you to split your scan into multiple single scans.